WARNING
DO NOT TOUCH THE INSIDE OF THE REFLECTOR - This will cause permanent damage
BULBS ARE FRAGILE - Gently ease them into the Globe Holder. Do not use any sideways force, otherwise the Globe might break. Do not over tighten screws
How to Focus Bulbs for Adjustable Focused QH Spotlights
*Spotlights Manufactured AFTER August 2018*
Changing QH Bulb
Step 1 – Remove reflector from case by:
Locating the joint in the Plastic Tube that contains the retaining Ring, and lift up the left hand side, then pull out the Retaining Ring
With the Retaining Ring removed, place your fingers on the Glass and then tap the edge of the Spotlight on a hard surface to dislodge the Reflector from the housing
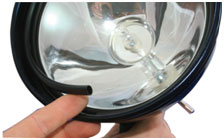
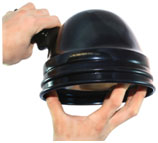
Step 2 – Unscrew the bulb holder from the back of the reflector
Step 3 – Take out old bulb from ceramic base bulb holder
Step 4 – Fit the 2 pins of the new bulb into the ceramic base bulb holder
**Do not touch the bulb with your hands, we suggest using the cardboard box it comes in to avoid leaving finger prints**
**Keep it nice and level as you fit it all the way to the bottom of the bulb holder**
Step 5 – Screw in the new bulb holder a couple of turns back into the reflector
Step 6 – Screw the locking ring on behind the bulb, keeping it loose until you have focused the beam
**Make sure the small cut out on the locking ring is aiming towards the back of the reflector**
Focusing QH Bulb
Step 7 – Plug spotlight into a power source
Step 8 – Check the beam against a flat wall to view the beam shape (we suggest 10m away)
Step 9 – Screw bulb inwards in a clockwise direction until you get your desired beam focus
**Screw inwards for a more tighter spot**
**Screw outwards for a wider spread**
Step 10 – Hold bulb in its position and tighten locking ring by hand as much as possible to lock in the desired beam focus
Step 11 – Re-check light beam is okay
Step 12 – Turn power source off
Step 13 – Re-fit reflector into the case by:
Placing the Reflector back into the Spotlight Housing, making sure the Filament of the Globe is Horizontal to the bottom of the Spotlight (6 o'clock)
Re-fit the Retaining Ring into the Housing. Do this by placing the end of the Ring that is solid in first, the other end of the Ring is cut short in the Tubing. Use this as a handle and compress the Ring a little so that it fits into the groove around the Reflector
Using your finger tips, squeeze the Ring in tightly to hold it all in place
How to Focus Bulbs for Non-Adjustable Focused QH Spotlights
*Spotlights Manufactured BEFORE August 2018*
Changing QH Bulb
Step 1 – Remove reflector from case by:
Locating the joint in the Plastic Tube that contains the retaining Ring, and lift up the left hand side, then pull out the Retaining Ring
With the Retaining Ring removed, place your fingers on the Glass and then tap the edge of the Spotlight on a hard surface to dislodge the Reflector from the housing
Find the Join in the Rubber that surrounds the Glass Lens and peel it back until you can lift the Lens out of the Reflector. Care must be taken at this point to keep your fingers off the Reflector surface. If you do touch it, then leave the mark alone. Trying to clean it off will further damage the Reflector surface


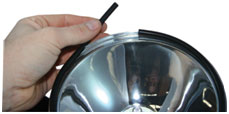
Step 2 – Carefully remove the old bulb from the bulb holder inside the reflector
Step 3 – Fit the 2 pins of the new bulb into the ceramic base bulb holder
**Do not touch the bulb with your hands, we suggest using the cardboard box it comes in to avoid leaving finger prints**
**Keep it nice and level as you fit it all the way to the bottom of the bulb holder**
Focusing QH Bulb
Step 7 – Plug spotlight into a power source
Step 8 – Check the beam against a flat wall to view the beam shape (we suggest 10m away)
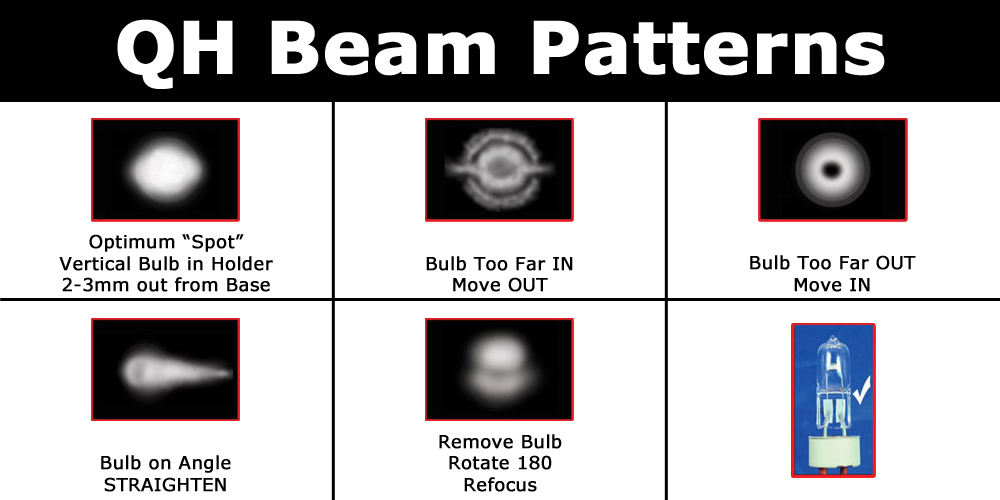
Step 9 – Look at the pattern of light that it is showing. If the pattern is not an Optimum Spot you can move the Bulb in or out of the Bulb Holder to broaden/tighten the Beam to the desired output
**The images below show different Beam Patterns that can occur, and how to fix them to get the Optimum Spot**
**Make sure to keep your fingers off the Bulb by using a cloth or cardboard when moving it. If you accidentally touch it while focusing then use Metho to clean it. Also, be careful as the Bulb can get very hot**
Step 10 – Re-check light beam is okay
Step 11 – Turn power source off
Step 12 – Re-fit reflector into the case by:
Fitting the Rubber Sleeve back around the edge of the Glass Lens and putting it back into the reflector
Place the Reflector back into the Spotlight Housing, making sure the Filament of the Globe is Horizontal to the bottom of the Spotlight (6 o'clock)
Re-fit the Retaining Ring into the Housing. Do this by placing the end of the Ring that is solid in first, the other end of the Ring is cut short in the Tubing. Use this as a handle and compress the Ring a little so that it fits into the groove around the Reflector
Using your finger tips, squeeze the Ring in tightly to hold it all in place
How to Focus Bulbs for Adjustable Focused HID Spotlights
*Spotlights Manufactured AFTER August 2018*
Changing HID Bulb
Step 1 – Make sure the HID bulb is the correct wattage for your HID Ballast!
Step 2 – Remove reflector from case by:
Locating the joint in the Plastic Tube that contains the retaining Ring, and lift up the left hand side, then pull out the Retaining Ring
With the Retaining Ring removed, place your fingers on the Glass and then tap the edge of the Spotlight on a hard surface to dislodge the Reflector from the housing


Step 3 – Unscrew the old bulb from the back of the reflector
Step 4 – Screw in the new bulb a couple of turns back into the reflector
Step 5 – Screw the locking ring on behind the bulb, keeping it loose until you have focused the beam
**Make sure the small cut out on the locking ring is aiming towards the back of the reflector**
Focusing HID Bulb
Step 6 – Plug spotlight into a power source
Step 7 – Check the beam against a flat wall to view the beam shape (We suggest 10m away)
Step 8 – Screw bulb inwards in a clockwise direction until you get your desired beam focus
**Screw inwards for a more tighter spot**
**Screw outwards for a wider spread**
Step 9 – Hold bulb in its position and tighten locking ring by hand as much as possible to lock in the desired beam focus
Step 10 – Re-check light beam is okay
Step 11 – Turn power source off
Step 12 – Re-fit reflector into the case by:
Placing the Reflector back into the Spotlight Housing, making sure the Filament of the Globe is Horizontal to the bottom of the Spotlight (6 o'clock)
Re-fit the Retaining Ring into the Housing. Do this by placing the end of the Ring that is solid in first, the other end of the Ring is cut short in the Tubing. Use this as a handle and compress the Ring a little so that it fits into the groove around the Reflector
Using your finger tips, squeeze the Ring in tightly to hold it all in place
How to Focus Bulbs for Non-Adjustable Focused HID Spotlights
*Spotlights Manufactured BEFORE August 2018*
Changing HID Bulb
Step 1 – Make sure the HID bulb is the correct wattage for your HID Ballast!
Step 2 – Remove reflector from case by:
Locating the joint in the Plastic Tube that contains the retaining Ring, and lift up the left hand side, then pull out the Retaining Ring
With the Retaining Ring removed, place your fingers on the Glass and then tap the edge of the Spotlight on a hard surface to dislodge the Reflector from the housing
Find the Join in the Rubber that surrounds the Glass Lens and peel it back until you can lift the Lens out of the Reflector. Care must be taken at this point to keep your fingers off the Reflector surface. If you do touch it, then leave the mark alone. Trying to clean it off will damage the Reflector surface


Step 3 – Unscrew the Locking Ring from the back of the Reflector
Step 4 – Pull out the Bulb Holder from inside of the Reflector
Step 5 – Unscrew/Loosen the four grub screws in the Bulb Holder and then pull out the old Bulb
Step 6 – Place the new Bulb into the Bulb Holder and then tighten the four grub screws
Step 7 – Put the Bulb Holder back inside of the Reflector
Step 8 – Screw the locking ring on behind the bulb, keeping it loose until you have focused the beam
**Make sure the small cut out on the locking ring is aiming towards the back of the reflector**
Focusing HID Bulb
Step 9 – Plug spotlight into a power source
Step 10 – Check the beam against a flat wall to view the beam shape (We suggest 10m away)
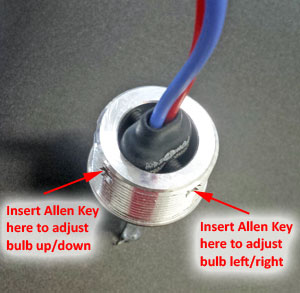
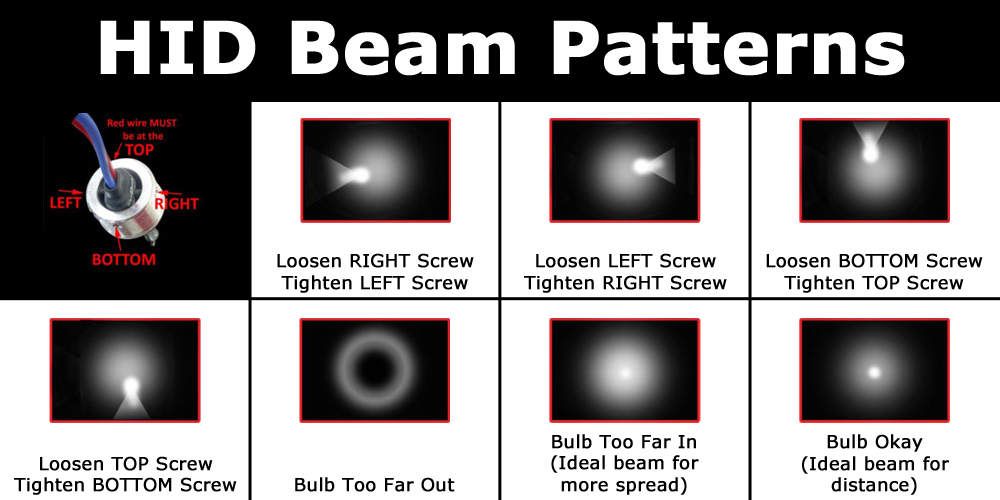
Step 11 – Look at the pattern of light that it is showing. If the pattern is not an Optimum Spot you can change the Spot by screwing/unscrewing the four grub screws in the Bulb Holder to broaden/tighten the Beam to the desired output
Use a 2mm Allen Key to wind in/out the grub screws on the side of the aluminium bulb holder to shift the bulb position
The longer grub screws are for adjusting left/right and the shorter screws are for adjusting up/down
**The images below show different Beam Patterns that can occur, and how to fix them to get the Optimum Spot**
**Make sure to keep your fingers off the Bulb by using a cloth or cardboard when moving it. If you accidentally touch it while focusing then use Metho to clean it. Also, be careful as the Bulb can get very hot**
Step 12 – Tighten locking ring by hand as much as possible to lock in the desired beam focus
Step 13 – Re-check light beam is okay
Step 14 – Turn power source off
Step 15 – Re-fit reflector into the case by:
Fitting the Rubber Sleeve back around the edge of the Glass Lens and putting it back into the reflector
Place the Reflector back into the Spotlight Housing, making sure the Filament of the Globe is Horizontal to the bottom of the Spotlight (6 o'clock)
Re-fit the Retaining Ring into the Housing. Do this by placing the end of the Ring that is solid in first, the other end of the Ring is cut short in the Tubing. Use this as a handle and compress the Ring a little so that it fits into the groove around the Reflector
Using your finger tips, squeeze the Ring in tightly to hold it all in place
